
Who needs store-bought granola bars when you have this delicious homemade healthy granola bar recipe! These no-bake granola bars are packed with peanut butter, honey, nuts and fruit and are perfectly chewy with no oven required! They’re easy, portable, kid-friendly, and a great make-ahead snack or breakfast! {Gluten-free, vegetarian & no refined sugar}
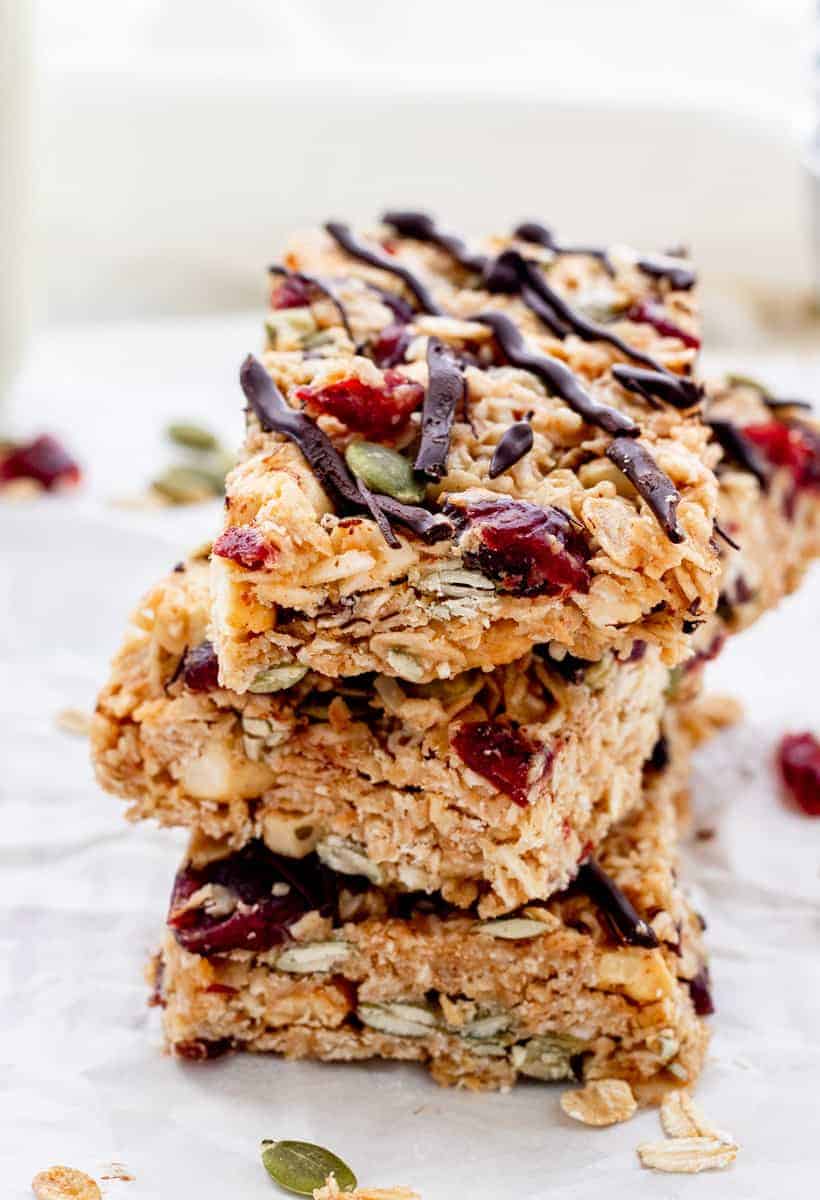
Table of Contents
Healthy grab and go snacks
In our house, we’re always on the hunt for healthy snacks that are also handy for taking on the go. That’s why we love this healthy granola bar recipe!
Homemade granola bars are where it’s at since you can control exactly which ingredients are going into them and you’re not stuck with all of the processed ingredients that they sneak into the store-bought bars.
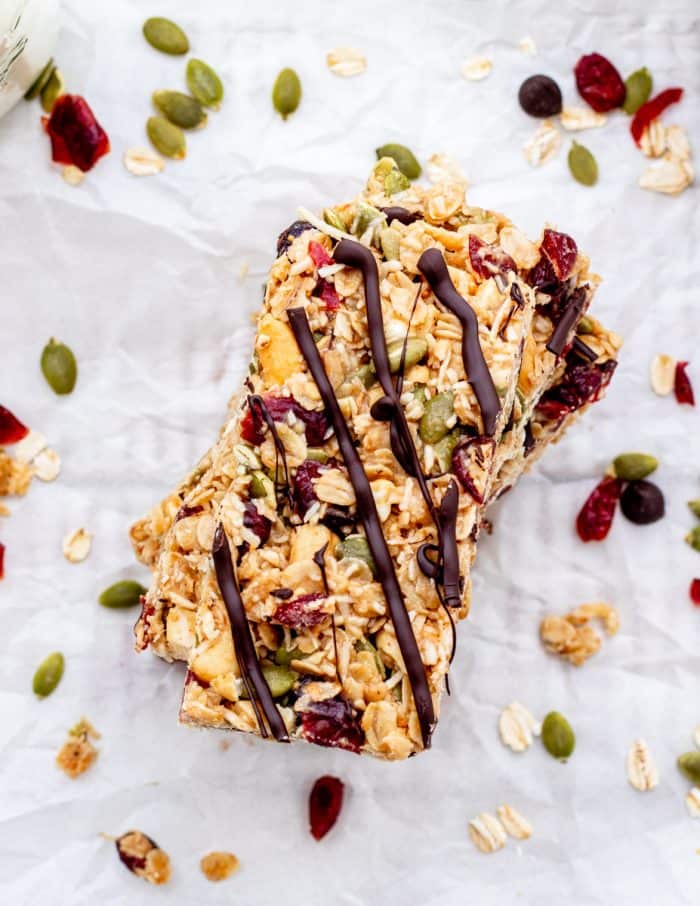
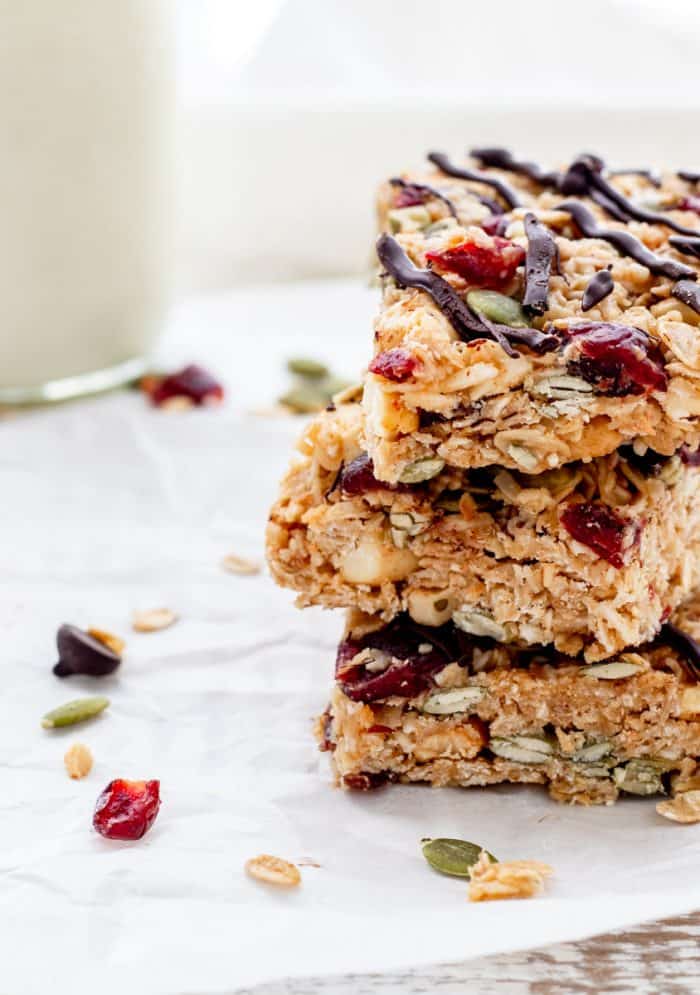
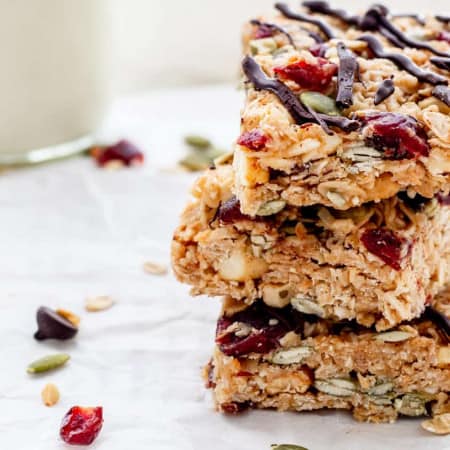
We love to pack ours with oats, peanut butter, honey, nuts, seeds, coconut and dried fruit (and a drizzle of chocolate to top it off), but these bars are very adaptable so you can easily switch up the flavours and ingredients.
The best part is, these DIY bars are no bake, so they’re super easy to prepare if you’re looking to whip up some make-ahead portable snacks for the week! And better yet, they’re chewy, delicious and kid-friendly too!
If you’re a granola lover, be sure to also check out this healthy chocolate granola and almond butter granola recipe (4 different ways)!
Why we love this granola bar recipe
- Easy to make: Only a few simple steps are required to create these bars and then you’ve got snacks for days!
- Fresh: Homemade granola bars always taste SO much better than store-bought granola bars. They taste so fresh, unlike some of the stale granola bars that you buy at the store (how long have they REALLY been sitting on that shelf?)
- Delicious: These DIY bars have so much flavour and texture. With the toasted oats and coconut, nuts and dried fruit, they’re infused with flavour and are perfectly sweet, nutty, chewy AND crunchy all at the same time.
- Easily customizable: With just a few simple substitutions, you can adapt these bars to make them vegan or nut-free if there are any allergies or intolerances in your family. Something you can’t do with store-bought bars.
- Portable: Eat them at home or take them with you on the run! They’re the perfect make-ahead snack for those busy days running around.
- Healthier option: These healthy granola bars are packed with fibre, healthy fats and antioxidants for a nutritious, filling and satisfying snack.
Ingredient notes
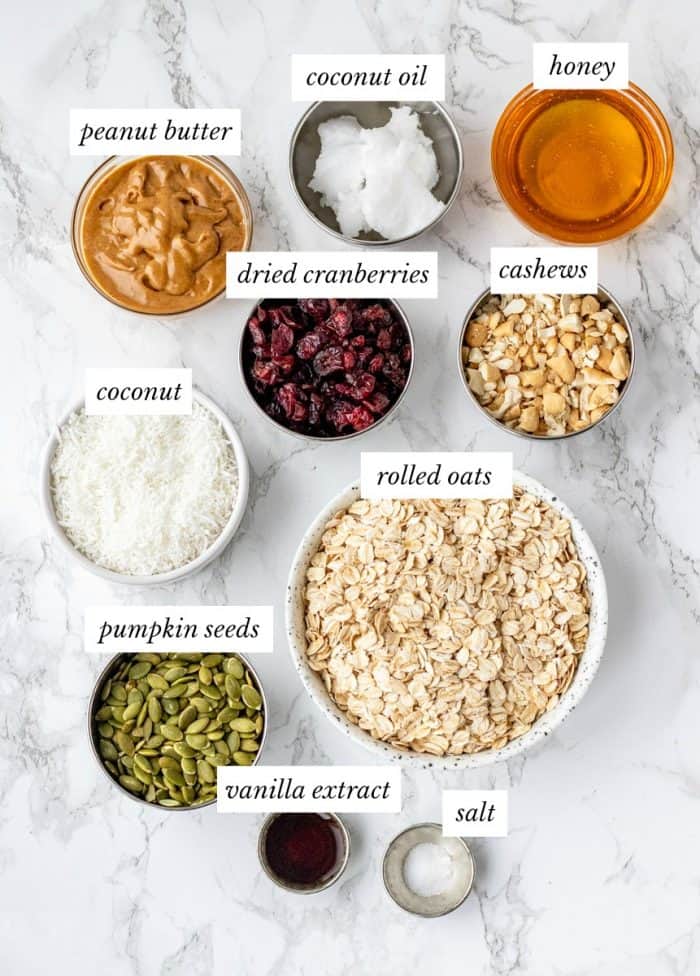
- Oats: Use large flake or rolled oats for a chewy texture. You can also sub in certified gluten-free oats if there are any gluten-intolerances. If you prefer a softer texture, you can also use quick oats.
- Coconut: The coconut adds a nice nutty flavour to the bars, especially when it’s toasted. Use unsweetened coconut flakes to limit added sugar.
- Cashews: Incorporates the perfect amount of crunch in every bite and some extra nutty flavour. You can also sub in other preferred nuts such as chopped almonds or peanuts.
- Peanut butter: Since these granola bars are no-bake, the nut butter helps to bind the ingredients together. Use natural peanut butter (we used one with just “peanuts” in the ingredients list) or sub in almond butter, cashew butter or a wow butter, sunflower or pumpkin seed butter if you require the bars to be nut-free.
- Honey: The honey adds a natural sweetness to the bars and also helps to bind the oat mixture together. You could also sub in maple syrup, agave nectar or brown rice syrup if desired.
- Coconut oil: Helps the bars to firm up when frozen or chilled. Use 100% unrefined coconut oil if possible.
- Pumpkin seeds: The pepitas add some additional crunch to the bars. We used raw unsalted pumpkin seeds, but you could also sub in sunflower seeds.
- Dried cranberries: Incorporates a chewy texture and pop of sweetness and colour. You could also sub in raisins or your preferred dried fruit. Chopped dried apricots or dried cherries would also work well.
- Chocolate chips: You can add the chocolate chips into the oat mixture whole or melt them to drizzle over the surface of the bars to add some extra sweetness and incorporate a chocolatey flavour. We used 50% dark chocolate chips, but you could melt dark chocolate squares or chunks as well.
Step by step instructions
It only requires a few simple steps to make these bars!
How to make homemade granola bars
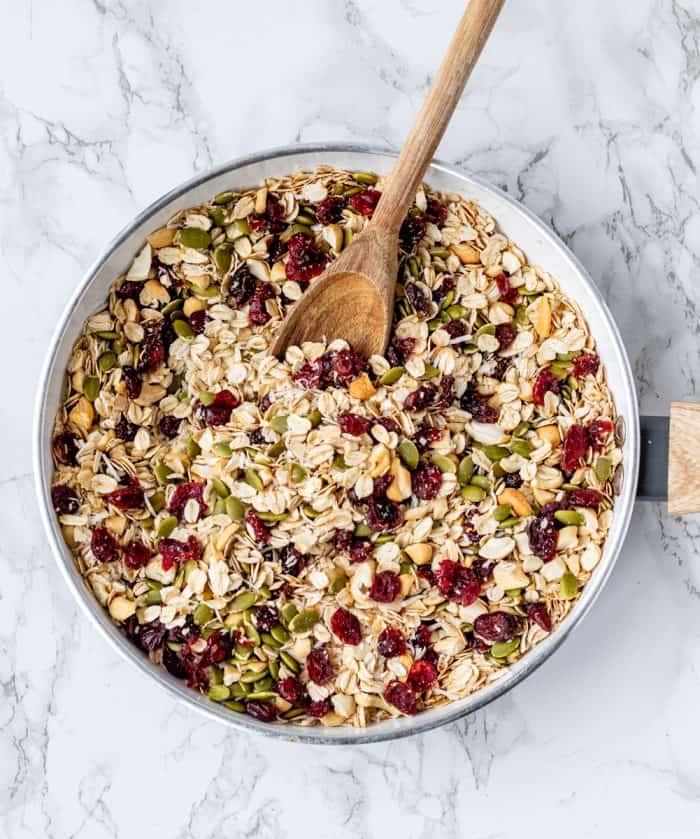
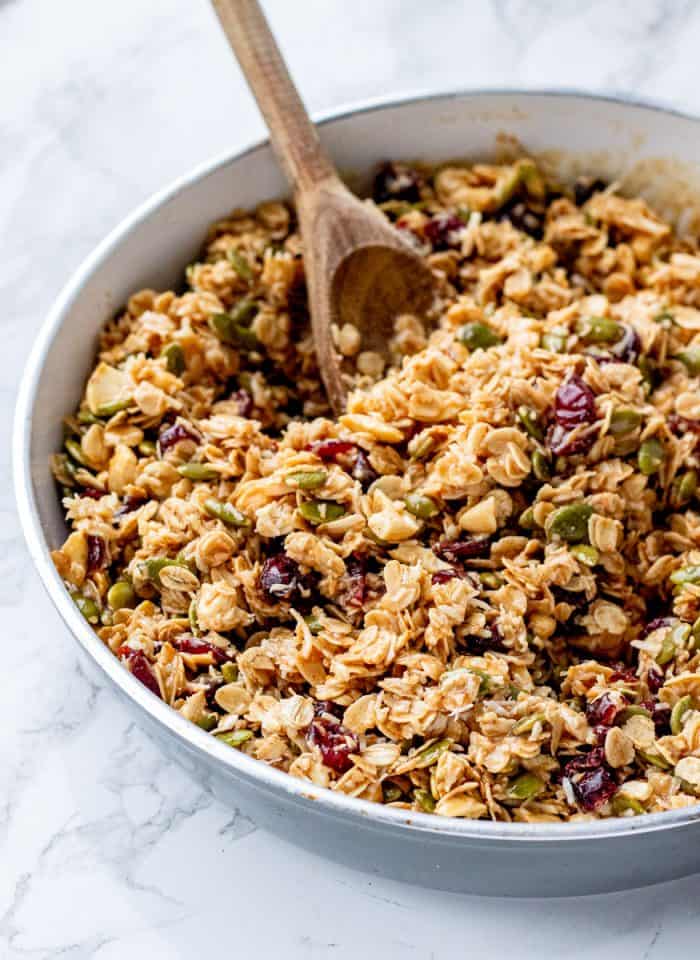
- In a large frying pan, toast oats and coconut for 3 minutes over medium heat. Add the chopped cashews, pumpkin seeds, and dried cranberries.
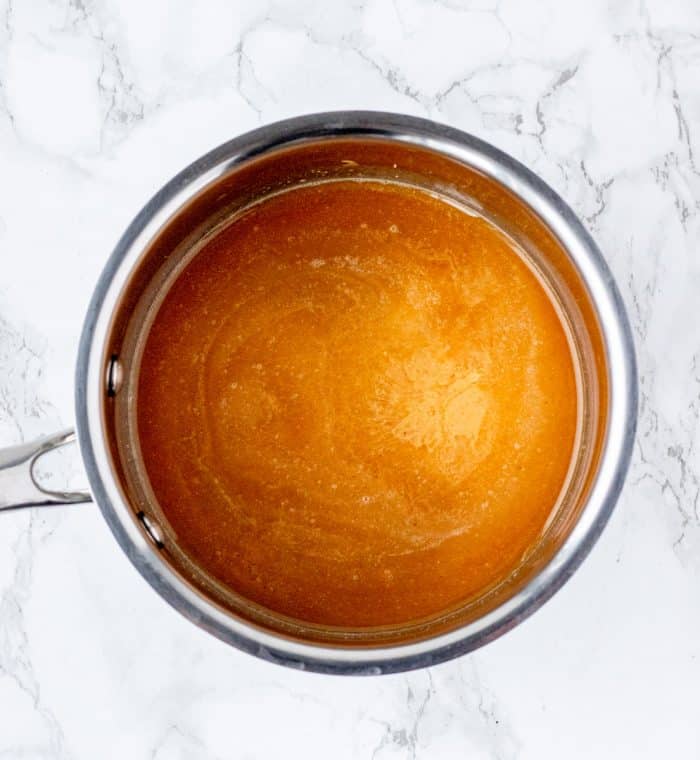
- In a separate small saucepan or frying pan, combine the coconut oil, honey, natural peanut butter, vanilla extract and salt. Cook for about 2 minutes or until coconut oil has melted.
- Add the liquid mixture to the toasted oat and coconut mixture and stir to combine. Cook for an additional 2 minutes until oats are coated and sticky.
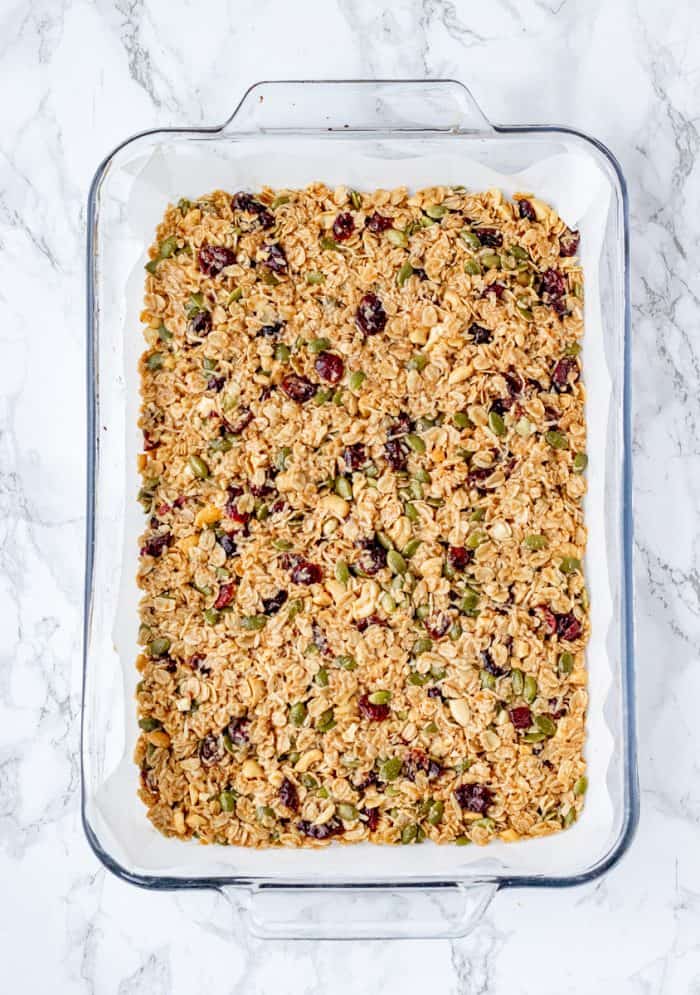
- Line a 9×13-inch baking pan with parchment paper. Dump the oat mixture into the pan and distribute evenly with spatula. Wet the spatula and press down on the surface until smooth and packed down.
- Place in the freezer for 30-40 minutes. Once hardened, drizzle with melted dark chocolate, if desired.
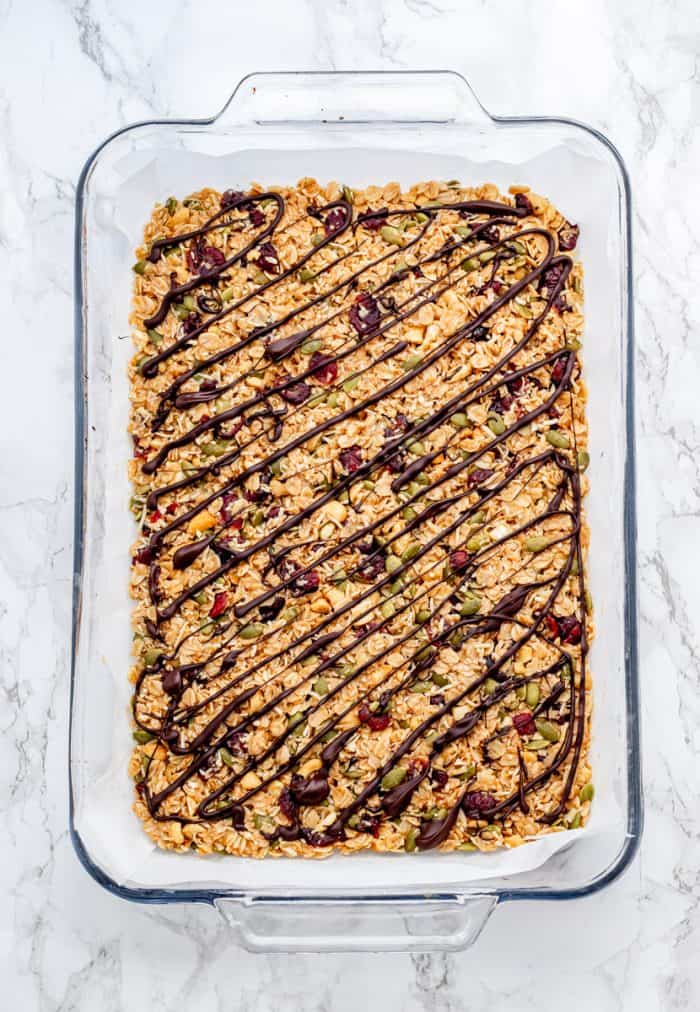
- Let it to sit for a few minutes to allow the chocolate drizzle to harden or place in the fridge for a few minutes.
- Use the parchment paper as a sling to lift the hardened mixture out of the pan. Cut into 24 small bars or 12 large bars.
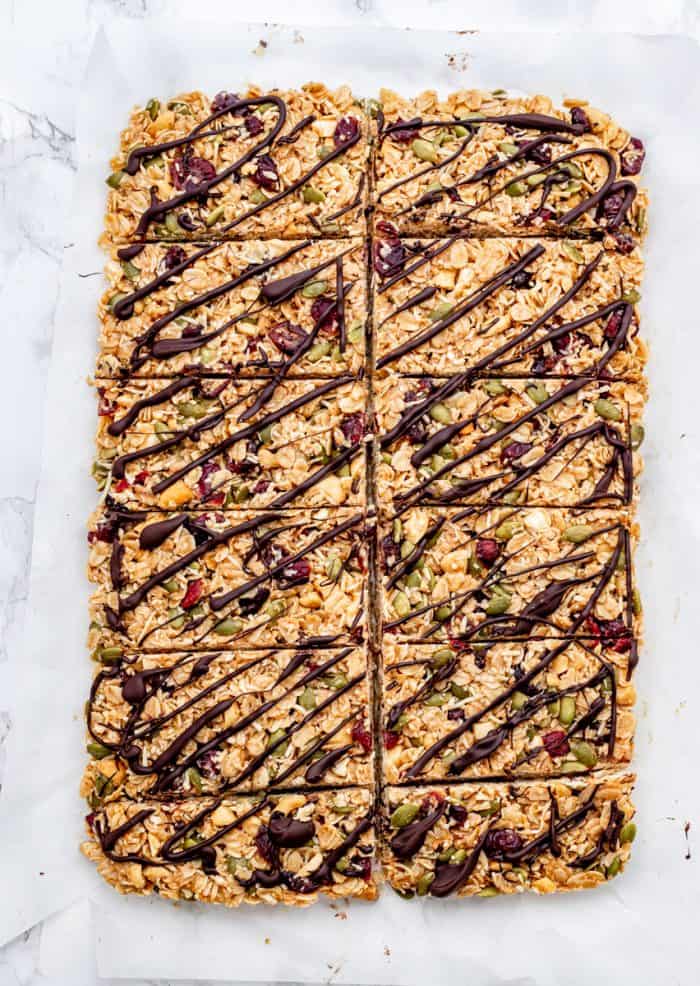
- I recommend cutting the bars while still partially frozen to help them stay together when cutting.
How to make the dark chocolate drizzle
So this part is totally optional, but who doesn’t love a little chocolate drizzle? It’s like the icing on the cake!
If you have time, you can go ahead and make some chocolate drizzle using one of the following methods.
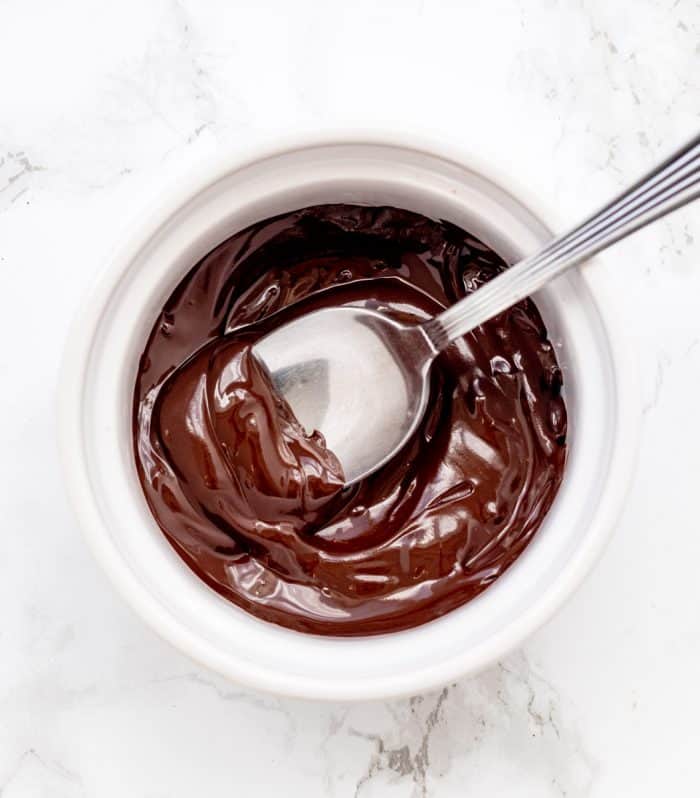
The microwave method: Place the dark chocolate chips in a microwave-safe bowl. Microwave the chocolate for 30 seconds on high. Remove and give it a stir. Just as a tip, the chocolate chips will retain their shape until you stir them, so don’t just eyeball it. Get your spoon in there! Repeat with 10- to 15-second blasts until most of the chocolate is melted. Remove from microwave and keep stirring until the residual heat melts the rest of the chocolate.
The stove method: Pour a few inches of water into a pot. Position a bowl over the pot, ensuring that the bottom of the bowl does not touch the water. Heat the water to a simmer. Turn off the heat and add 2/3 of the chocolate chips to the bowl. Stir gently to melt. Add the remaining 1/3 of the chocolate a little at a time and stir gently until melted.
Once the chocolate is all smooth and melted, you can grab a spoon and lightly drizzle it over the bars. It may take several minutes for the chocolate to harden.
To speed up the process you can put bars with the drizzled chocolate in the fridge or freezer for a few minutes.
Recipe Notes for the best granola bars:
- Press mixture tightly into pan: Pack the granola bar mixture tightly into the pan so that it sticks together, making sure that you pack it into the corners of the pan as well. You’ll also want to make sure that the mixture is evenly distributed so that the bars are all the same size and thickness. When pressing the granola bar mixture into the pan, wet a spatula or the back of a spoon or fork to prevent it from sticking to the mixture.
- Don’t rush the chilling time: It can be tempting to eat these bars as soon as they’re pressed into the pan, but if you cut them too soon, they’ll be too soft and will probably fall apart. They need enough time to chill in order to firm up and cut through them more easily. Allow them to chill for at least 30-40 minutes before trying to cut them into bars.
- Cut bars while partially frozen: I recommend cutting these bars when they’re still partially frozen (I let mine thaw for about 20 minutes before cutting) since it will be easier to cut them when they’re firm and will also help them better adhere together. Use a long sharp knife and cut all the way through to prevent them from getting crumbly.
- Keep chilled to help them firm up: I recommend eating these granola bars when they’re still slightly chilled or partially frozen since they will start to soften up when left at room temperature for too long. If they start to soften up too much, pop them back in the fridge or freezer to allow them to firm up again. It’s generally best if you handle these bars while still partially frozen as they can get a little crumbly and sticky when completely thawed.
- Make them in advance for meal prep: The bars are pretty thick and filling. This recipe makes 24 small bars or 12 large bars. It makes a large batch so it’s perfect for meal prep!
Storage guidelines
You might be wondering how long homemade granola bars are good for. Good question!
These granola bars can be stored in an air-tight container in the fridge for up to a week or in the freezer for up to two months. If you stack the bars, be sure to separate them with parchment paper so that they don’t stick together.
It’s generally best if you handle these bars when chilled as they can get a little crumbly when left at room temperature for a while.
How to wrap granola bars
You can wrap the bars individually in saran wrap or snack-sized ziplock bags for quick grab and go snacks!
Recipe FAQs
In order to get granola bars to adhere together, it’s important to mix some binding agents in with the oats and other add-ins. In this recipe, we use honey, peanut butter and coconut oil to help bind the granola bars together so that they don’t fall apart once pressed into the pan and chilled.
Homemade granola bars can be a much better option than store-bought since you can control the exact ingredients that you’re putting into them.
With this recipe, we use rolled oats which are a great source of soluble fibre that can help keep blood sugar levels stable and lower bad cholesterol. Natural peanut butter, nuts and seeds are incorporated to add some healthy fats and protein which also enhance your satiety (feeling of fullness) when eating these bars.
Although still a source of sugar, the honey replaces the typical refined sugar that’s used in store-bought bars and offers up some additional vitamins, minerals and antioxidants. The dried fruit and dark chocolate contribute some additional antioxidants as well. Those are some pretty nutrient-packed bars! Even though they’re a healthier option than store-bought, it’s still important to be mindful and keep your portion sizes in check.

Easy optional add-ins
Use the suggested add-ins or try out some of your own combinations!
Try:
- Regular or mini chocolate chips
- Raisins
- Chopped almonds
- Peanuts
- Sunflower seeds
- Chia seeds
- Hemp hearts
- Chopped dried apricots
So many ways to switch these bars up!
Recipe variations
- To make vegan: Replace the honey with maple syrup, agave nectar or brown rice syrup.
- To make nut-free: Sub in seeds such as sunflower seeds for the cashews and use a sunflower or pumpkin seed butter instead of the peanut butter.
- To make toddler-friendly: If serving these bars to children under the age of four, you may wish to skip the nuts and larger seeds, as they can be a choking hazard. Instead, for a fun and tasty addition, sub in mini chocolate chips. Hemp hearts would also be a great nutrient-dense add-in.
More healthy bars:
- Peanut Butter Protein Bars
- Healthy Oatmeal Breakfast Bars
- Rice Krispie Treats without Marshmallows
- Homemade Larabars
- Lemon Larabar Recipe
- Key Lime Protein Bars
- Sweet Potato Bars
- Peanut Free Snack Bites
Did you make this recipe? Scroll down to leave a star rating and review!
Healthy Granola Bar Recipe
Video
Ingredients
- 2 cups rolled oats (can also sub in gluten-free oats)
- 1 cup unsweetened coconut flakes
- 1/2 cup cashews finely chopped
- 1/2 cup pumpkin seeds
- 1/2 cup dried cranberries
- 5 tbsp coconut oil
- 1/2 cup honey
- 1/2 cup natural peanut butter or sub in seed butter to make nut-free
- 2 tsp vanilla extract
- 1/4 tsp salt
- 1/4 cup dark chocolate chips melted (optional)
Instructions
- In a large frying pan, toast oats and coconut for 3 minutes over medium heat. Add the chopped cashews, pumpkin seeds, and dried cranberries.
- In a separate small saucepan, combine the coconut oil, honey, natural peanut butter, vanilla extract and salt. Cook for about 2 minutes or until coconut oil has melted.
- Add the liquid mixture to the toasted oat and coconut mixture and stir to combine. Cook for an additional 2 minutes until oats are coated and sticky.
- Line a 9×13-inch baking pan with parchment paper. Add the oat mixture into the pan and distribute evenly with spatula. Wet the spatula and press down on the surface until smooth and packed down, making sure that you get into all of the corners.
- Place in the freezer for 30-40 minutes. Once hardened, remove from freezer and drizzle with melted dark chocolate, if desired.
- Cut into 12 large bars or 24 small bars while mixture is still partially frozen to help the bars stay together while cutting. Serve immediately or store in the freezer for later.
Notes
- Pack the granola bar mixture tightly into the pan so that the mixture sticks together, making sure that you pack it into the corners of the pan as well. You’ll also want to make sure that the mixture is evenly distributed so that the bars are all the same size and thickness. When pressing the granola bar mixture into the pan, wet a spatula or the back of a spoon or fork to prevent it from sticking to the mixture.
- I recommend cutting these bars when they’re still partially frozen (I let mine thaw for about 20 minutes before cutting) since it will be easier to cut them when they’re firm and will also help them better adhere together. Use a long sharp knife and cut all the way through to prevent them from getting crumbly.
- I suggest eating these granola bars when they’re still slightly chilled or partially frozen since they will start to soften up when left at room temperature for too long. If they start to soften up too much, pop them back in the fridge or freezer to allow them to firm up again. It’s generally best if you handle these bars while still partially frozen as they can get a little crumbly and sticky when completely thawed.
- The bars are pretty thick and filling. This recipe makes 24 small bars or 12 large bars. It makes a large batch so it’s perfect for meal prep! The nutritional facts are calculated based on 24 bars.
- These granola bars can be stored in an air-tight container in the freezer for up to a month. If stacking them, I recommend putting some parchment paper in between them to prevent them from sticking together.
Nutrition
This recipe was originally posted December 2019 and was updated January 2022 to include more helpful tips and photos.


Turned out great! Yum
So happy you enjoyed the recipe Christine! Thanks so much for stopping by to leave a comment :)
Do you think you could replace the honey with maple syrup and get a satisfactory result?
Yes, maple syrup should work out fine!