
Looking for a unique rustic shelf that doesn’t break the bank? This DIY Wooden Crate Shelf adds character and is totally customizable depending on the colour of stain and number of crates you choose! Perfect for a nursery, bedroom, office or bathroom!
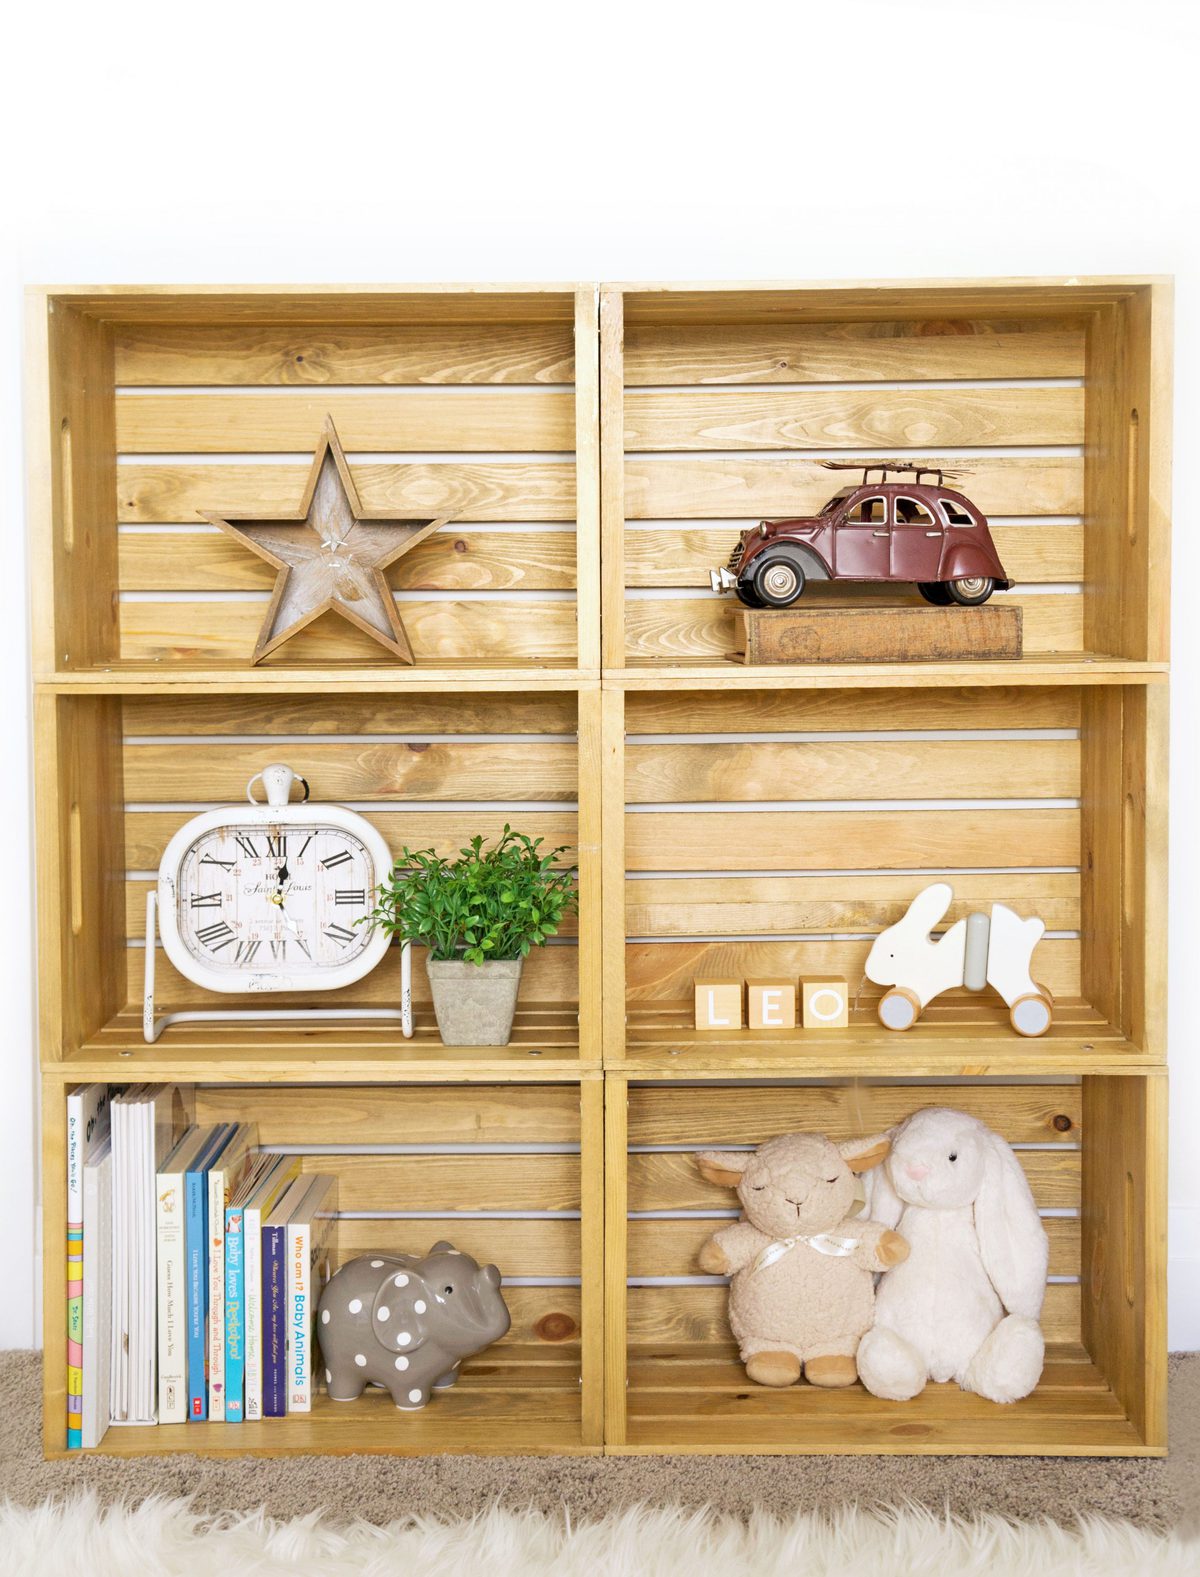
Table of Contents
Wooden Crate Shelf
It’s been about a month and a half since we moved into our new house and we’ve been gradually trying to get the house together room by room. I started some small projects like these DIY Tin Can Decorative Vases and DIY Inspiration Cork Board to spruce up my office space while we were waiting for our furniture to arrive. However, our biggest priority when we moved in was to get our little guy’s room together so that he would have a nice little safe area to play.
We had been trying to find a solution for his growing collection of books and other room decor that hadn’t quite found a home yet. It was basically all stuffed inside his closet. NOT a good way to stay organized.
In our previous house, his room didn’t have enough space for a book shelf, so we decided to hold off on that for a while until we moved.
Now that he has a bigger room, we thought it would be the perfect opportunity to add in a shelf since there was some empty wall space.

We didn’t just want a plain old white shelf though. We wanted to incorporate a rustic looking shelf. Something with a bit of character.
I happened to be searching online one day and got really inspired when I saw that you could transform wooden storage crates into a bookshelf. I mean, who even came up with that idea?!
So brilliant.
So immediately I knew that’s what I wanted to do for his room. Create a cute DIY Wooden Crate Bookshelf.
We found the wooden crates at Michaels for about $15 a crate, but you can also find them here.

We decided to go with six crates, but the beauty of these DIY wooden crate shelves is that you can adapt them to make them as big or as small as you’d like!
Next, we picked up some stain. We got the stain with a weathered oak hue because we wanted a lighter finish with more golden tones. However, there are so many opportunities to customize these shelves by choosing the stain colour you prefer!
I got to work staining them, only applying one coat since that gave me the look I was going for. Once dry, I applied a coat of varathane to seal everything in.

Our next task was to figure out how to secure the crates together. My husband suggested using Chicago screws since they have a flat head that blends in nicely with the shelf.
I also liked how the screws gave the shelf a rustic look.

We bought the screws in two different sizes, longer ones to secure the crates together side by side and shorter ones to secure the crates one on top of another.
All that was required was drilling some holes in each of the four corners of the bottom and sides of the shelf and sticking the screws into the holes, screwing tightly with a screwdriver to secure.

As it turns out, they worked perfectly!
Now that the shelf was all assembled, the next step was to secure the shelf to the wall since our little guy is super active and is pulling himself up onto everything! It’s highly recommended that you attach the shelf to the wall, especially if you have active little ones.
We just used two brackets and a couple of screws to achieve this.

Finally, we decorated the shelf, starting with his books and then filled in the missing gaps with other decorative items.
Some decorating ideas include:
- A cute old fashioned car
- Stuffed animals (like this adorable Jellycat bunny)
- A small fake plant or succulent
- Wooden toys
- Wooden Blocks
- A clock
- A rustic star
- A small lamp
- A piggy bank
- Old rustic books
So many options for decorating these shelves!

Luckily, I had my decorating assistant to step in and arrange the shelves according to his preference ;)

The beauty of this wooden crate shelf is that you can use it as a nursery bookshelf, but you can also use it in any bedroom, bathroom, living room or office space!
It’s so versatile and totally customizable depending on the style of your room.
Here are some of the materials needed to create this shelf!
How to Create a DIY Wooden Crate Book Shelf
Supplies Required:
- Six wooden crates
- Wood Stain (We used Minwax Wood Stain in Weathered Oak)
- Rag for Staining
- Varathane (we used satin finish)
- Drill
- 16 Chicago Screws (1 1/2 inches)
- 16 Chicago Screws (5/8 inch)
Instructions:
- Using a rag, stain each of the six crates both on the interior and exterior. Wait for it to dry. I only applied one coat of stain, but you can do as many layers as you’d like to achieve your desired colour.
- Next, using a paint brush, apply a layer of varathane on the interior and exterior of each of the crates. Wait for it to dry.
- Once dry, stack two of the crates on top of each other vertically so that the edges line up. Drill a hole in each of the four corners. Insert the chicago screw and screw until tight (you may require a screwdriver to tighten). Repeat for the remaining two sets of two crates.
- Turning the attached crates horizontally, stack on top of one another, until they’re completely aligned. Drill four more holes in the corners of each of the crates and insert the 5/8 inch screw.
- If placing the shelf in a child’s room, it’s recommended that you screw the shelf to the wall (we used brackets). Once the shelf is secure, decorate with desired items.

At the end of the day, this shelf cost us less than $150 to make. I’m pretty sure if you found a shelf like this at Urban Barn or Pottery Barn, it would cost quite a bit more than that, so in my mind it was a really good deal!
Plus, it has special meaning since we created it ourselves!
How would you use these DIY Wooden Crate Shelves?
More DIY projects
- DIY Ornament Wreath
- DIY Decorative Tin Can Vases
- DIY Inspirational Cork Board
- DIY Mason Storage Jars
- DIY Glitter House


How do you make divider shelfs for the inside of the crate.
Loved your ideas. I wanted to use crates for shoe storage. I can get four
shoe boxes inside of a crate. I would do this if there was a divider.
Thank you
Thanks Jacqueline! I love your idea about using these shelves for shoe storage! I’m not 100% sure how you would make divider shelves. Perhaps you could try securing a couple of L-brackets inside the crate and rest a piece of wood on top to create a divider in each crate? Please let me know if you find a solution!
Hi don’t mean to intrude but you can screw a small piece on the sides of the inside like flush up against the sides then place a small shelf like piece of wood probably really thin to sit or slide on top of the two pieces you screwed in as the support for the shelf. Trying to explain as much as I can since I am not able to sketch it for you. Hope you pick up what I’m putting down hahah always wanted to say that. I won’t be on here again just looking for a crafty craft myself with my crates Love the shoe idea actually did the same thing but realized it wasted to much space so I used all of our rain and snow boots instead. Going to try shoes or books next Take care !
I love how you secured it to the wall! Safety first. :) If you are on a budget, but have time and patience, you can download the app and use a 40% off coupon on the crates. You’ll either have to make multiple transactions on different dates, or go to different stores.
Thanks Beks! Definitely have to think about safety first with a busy baby! That’s such a great suggestion to make use of the 40% off coupons, or going to different stores. I’ll have to try that for my next project ;)
What a great idea Elysia…way to go girl!
Thanks so much!