
These No-Bake Peppermint Cheesecake Bites make the perfect healthier festive treat for the holidays! Made with a raw vegan cashew cheesecake layer, delicious chewy chocolate mint crust and topped with a sprinkle of crushed candy canes, each cup is a perfectly decadent, yet portioned bite to eat! Make up a batch and store them in the freezer for a ready-made dessert anytime. They’re the perfect holiday dessert! {Vegan, gluten-free & paleo}

Table of Contents
No Bake Peppermint Cheesecake Recipe
If you’re a lover of chocolate mint cheesecake and crunchy candy cane, you’ll be a huge fan of these no bake peppermint cheesecake bites. This raw vegan cheesecake is perfectly sweet, creamy, chewy, rich and pepperminty — so many delicious flavors and textures happening in one bite! Additionally, this sweet little treat is a completely no-bake option so it’s a great make ahead dessert to serve up over the busy holiday season.
And because they’re individually portioned, these mini candy cane cheesecakes make a great finger food dessert for entertaining or serving to the kids. Totally no-fuss since no plates or utensils are required!
Super easy and so much fun to make…and eat!
If you’re looking for more healthier holiday treats, be sure to check out our Easy Christmas Fudge and Pretzel Reindeer Bites too!

Why We Love This Mini No Bake Candy Cane Cheesecake
- Perfectly portioned for a single serving
- Made with less sugar
- Creamy cheesecake layer with pops of chocolate mint
- Gluten-free, dairy-free, vegan, and paleo!
- Formulated by a Registered Dietitian to be a source of antioxidants, fiber, and nourishing fats
- Easy no bake dessert with a classic holiday flavor
- Made completely from scratch
- Super easy holiday dessert that works for a wide range of dietary needs
Ingredient Notes
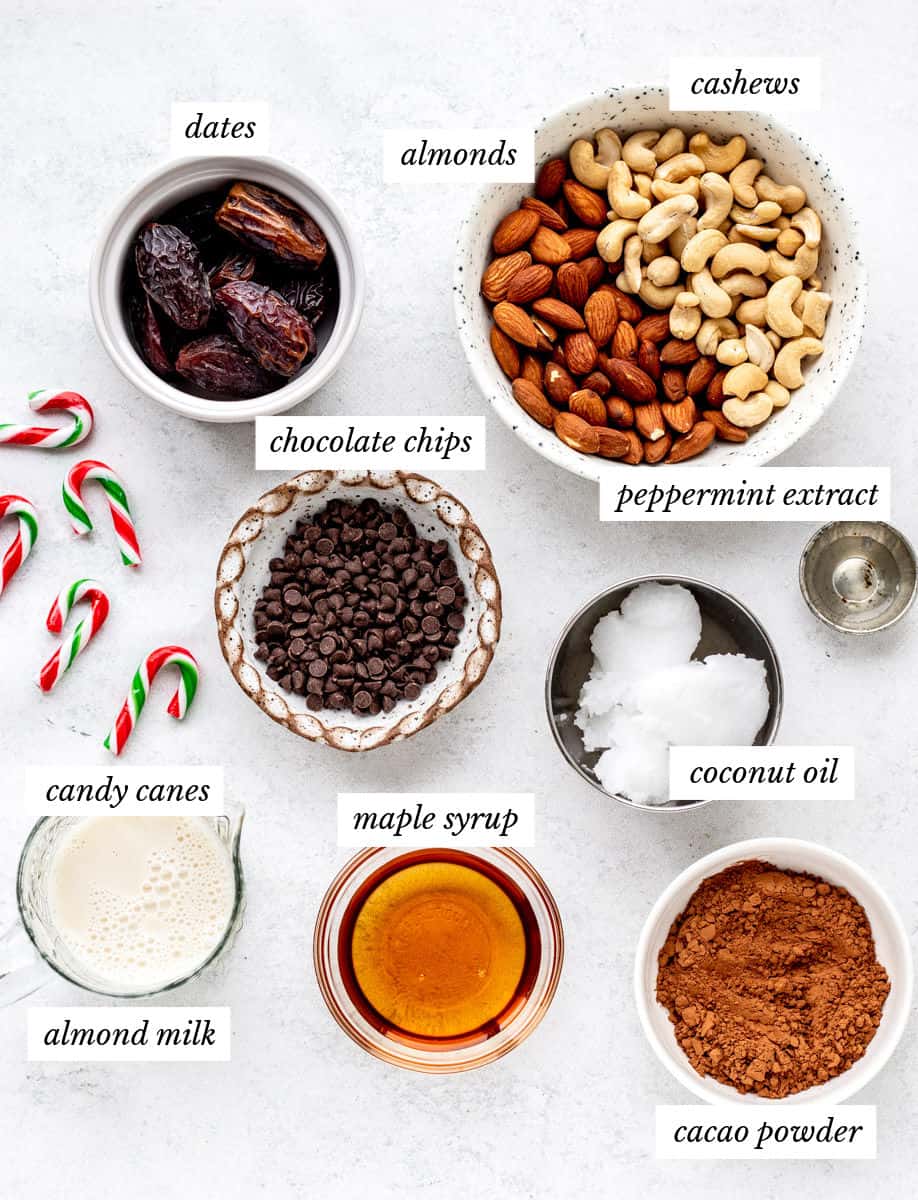
- Dates: Use pitted Medjool dates or regular baking dates. Be sure to soak them for several minutes if they seem too hard to blend.
- Nuts: For the chocolate crust, I typically use a combination of unsalted almonds and cashews for a nice nutty flavor. Use roasted nuts for an even stronger flavor. For the raw cheesecake layer, be sure to soak the cashews for at least 2 hours so that they produce a creamy texture when blended.
- Cacao powder: Adds a rich chocolate flavor to the cheesecake crust. Use cacao powder for a less processed option, although unsweetened cocoa powder will work too.
- Coconut oil: To help the cheesecake layer harden slightly after freezing or refrigerating. Use unrefined coconut oil for a subtle coconut flavor or sub in refined if you don’t like that coconut taste.
- Almond milk: To make the cashew cheesecake layer smooth and creamy. Use unsweetened almond milk or sub in another plant-based milk such as cashew milk, or regular dairy-based milk if preferred.
- Peppermint extract: Contributes that peppermint flavor to the cheesecake and crust.
- Maple syrup: For a little sweetness into the raw cheesecake layer. Use 100% pure maple syrup or sub in honey if the recipe doesn’t need to be vegan.
- Chocolate chips: Adds more of those rich chocolate flavors to the crust layer. I like to use mini chocolate chips, since they’re easier to break down and distribute through the crust mixture, however, regular size would work too. Use dairy-free if you wish to keep this recipe vegan.
- Candy canes (optional): I like to crush candy canes or peppermint candies for a colorful garnish that tells everyone what to expect when they take a bite! You don’t have to top the cups with crushed candy cane if you want to keep them on the healthier side. They just make the cups look more pretty and festive and add to the peppermint taste.
Step-by-Step Instructions
To make the chocolate mint cheesecake crust


- Soak dates for crust in a bowl of boiling hot water for about 10 minutes to soften. In a food processor, combine the almonds, cashews, cocoa powder and salt until the nuts are finely ground.
- Add in the dates, peppermint extract and chocolate chips and blend until mixture comes together. You may need to add a tablespoon of water if mixture seems too dry.
To make the raw vegan cheesecake


- Soak cashews for the cheesecake layer in hot water for at least 2 hours. Next, combine all ingredients for the cheesecake layer in powerful blender or mini blender until smooth and creamy.
To make the no bake cheesecake bites


- Line a muffin tin with 10 silicone baking cups. Divide the crust mixture evenly between the cups and press into the bottom of the cup with a spoon or small spatula until the surface is packed down and flat. Spread the cheesecake mixture over the crust with a spatula until relatively smooth and flat. Garnish with crushed candy cane, if desired.
- Place in freezer for at least an hour to allow the cups to harden. Consume frozen, cold or at room temperature.

Expert Tips
- For best results, I recommend soaking both the dates and cashews in advance to soften them up so that you achieve the right consistency for these cups. We don’t want big hunks of cashews and dates in these cups. I usually like to put them both in water when I wake up in the morning and then they’re good to go for when I want to make the recipe later in the day. Alternatively, you could soak them overnight if you’d like to make the recipe the following morning.
- You’ll also want to use a REALLY powerful blender to blend those cashews so that they’re smooth and silky, not gritty. Once again, the only chunks we want in these Chocolate Peppermint Cheesecake Cups are chunks of chocolate. NOT chunks of cashews and NOT chunks of dates, unless, of course, that’s what floats your boat.
- I like making these cheesecake bites in silicone baking cups or a silicone muffin tray since it makes them really easy to pop out of the muffin tin once frozen.
- If you choose to forego the candy cane chunks, I highly recommend serving them along with some of this Celestial Candy Cane Green Tea to accentuate even more of that minty flavour. It’s seriously the best tea EVER! I buy it in bulk every year.
- The cheesecake mixture will get pretty soft if left at room temperature for extended periods of time so I recommend eating these cups fresh out of the fridge or freezer, unless you like really creamy cheesecake. Simply allow them to thaw out of the freezer for about 20 minutes or so and then dig in!

How to Store
For best results, I recommend storing these peppermint cheesecake bites in the freezer in an airtight container. They can be stored in the freezer for up to a month.
When you’re ready to serve, simply let them thaw at room temperature for about 10-20 minutes.
Recipe FAQs
The beauty of these mini peppermint cheesecakes is that you can serve them up any way you’d like! If you serve them from frozen, they tend to be a bit firmer, but still delicious! If you serve them up from the fridge, they will be creamier, while still maintaining their shape. If left at room temperature for a while, they will soften up significantly which will result in a much creamier texture.
It’s totally a personal preference. If these candy cane is sitting on these cups for a while, it may start to bleed into the cheesecake mixture, which isn’t a big deal, but may slightly affect the presentation. For the freshest results, you can allow the cheesecake bites to thaw slightly before topping with the crushed candy cane.
I haven’t personally tried using cream cheese, but you could certainly experiment with it! It may result in a slightly different texture and flavor, but would still probably be delicious with the chewy chocolate crust!

Serving Suggestions
Serve these peppermint cheesecake bites after your Christmas dinner or at a holiday party! To decorate, garnish with a sprinkle of crushed candy cane, shaved dark chocolate, or even little pieces of crushed peppermint bark.
For an extra creamy note, feel free to add a swirl of non-dairy whipped cream.
To make them even more festive, serve with some Dark Chocolate Hot Chocolate or Candy Cane Green Tea!
Recipe variations
- Different nuts: For the chocolate crust, you can use all almonds or all cashews, or try a different combo. Pecans or walnuts would work well too.
- Use a chocolate cookie crust: Although I love the nutty chocolate crust, I totally understand if you want that classic Oreo crust. Feel free to try using low-sugar chocolate sandwich cookies (like Leos) or just use the real deal for a special holiday treat. They’re still vegan, so it won’t change that!
- Make no bake peppermint cheesecake bars: Instead of using a muffin pan, spread the crust into the base of a square baking dish lined with parchment paper, then top with the creamy cheesecake filling. Let the mixture set in the freezer, then slice into bars or squares for easy serving.

More Healthy Holiday Recipes
- 3-Ingredient No Bake Cheesecake
- Oatmeal Thumbprint Cookies
- Chocolate Coconut Balls
- No-Bake Vegan Lemon Berry Cheesecake Cups
- Strawberry Cheesecake Cups
- Healthy Baked Donuts
Did you make this recipe? Scroll down to leave a star rating and review!

No Bake Peppermint Cheesecake Bites
Ingredients
For the chocolate crust:
- 1/2 cup pitted dates soaked for at least 10 minute in boiling hot water
- 1/2 cup almonds
- 1/2 cup cashews
- 2 tablespoons cacao powder
- Pinch of salt
- 1/2 teaspoon peppermint extract
- 2 tablespoons mini dark chocolate chips
For the raw cheesecake layer:
- 1 1/2 cups soaked cashews
- 1/2 cup + 2 tablespoons almond milk
- 4 tablespoons coconut oil
- 3 tablespoons maple syrup
- 1/4 teaspoon peppermint extract
Optional Toppings:
- Sprinkle crushed candy cane on top of each cup
Instructions
- Soak cashews for the cheesecake layer in hot water for at least 2 hours. At the same time, soak dates for crust in boiling hot water for about 10 minutes to soften.
- In a food processor, combine the almonds, cashews, cocoa powder and salt until the nuts are finely ground.
- Add in the dates, peppermint extract and chocolate chips and blend until mixture comes together. You may need to add a tablespoon of water if mixture seems too dry.
- Next, combine all ingredients for the cheesecake layer in powerful blender or mini blender until smooth and creamy.
- Line a muffin tin with 10 silicone baking cups. Divide the crust mixture evenly between the cups and press into the bottom of the cup with a spoon or small spatula until the surface is packed down and flat.
- Spread the cheesecake mixture over the crust with a spatula until relatively smooth and flat. Garnish with crushed candy cane, if desired.
- Place in freezer for at least an hour to allow the cups to harden. Consume frozen, cold or at room temperature.
- Store in the fridge for up to a week or in the freezer for up to a month.
Notes
- For best results, I recommend soaking both the dates and cashews in advance to soften them up so that you achieve the right consistency for these cups. We don’t want big hunks of cashews and dates in these cups. I usually like to put them both in water when I wake up in the morning and then they’re good to go for when I want to make the recipe later in the day. Alternatively, you could soak them overnight if you’d like to make the recipe the following morning.
- You’ll also want to use a REALLY powerful blender to blend those cashews so that they’re smooth and silky, not gritty.
- I like making these cheesecake bites in silicone baking cups or a silicone muffin tray since it makes them really easy to pop out of the muffin tin once frozen.
- You don’t have to top the cups with crushed candy cane if you want to keep them on the healthier side. It just makes the cups look more pretty and festive and adds to the peppermint flavor.
- The cheesecake mixture will get pretty soft if left at room temperature for extended periods of time so I recommend eating these cups fresh out of the fridge or freezer, unless you like really creamy cheesecake. Simply allow them to thaw out of the freezer for about 20 minutes or so and then dig in!
Nutrition
Adapted from my Pumpkin Spice Cheesecake Bites
This recipe was originally posted in November 2018 and was updated in December 2024 to include more helpful tips.


These are delicious! I like that it is not loaded with white sugars and flours. Still have a lot of calories, but worth it! Thanks for sharing this recipe, as it is a new holiday fav!
So glad you enjoyed them! They’re always a favorite around here too :) Thanks so much for taking the time to leave a rating and review!
Is it 300 cal per 1 ?
Yes, the nutritional information is a rough estimate for one cheesecake bite.
Is it possible to make these with a basic cookie crust and a regular cream cheese filling?
You could certainly try it out! I haven’t tried it myself, so let me know how it turns out if you decide to give it a shot!